Geek Kid Costumes

This is my 200th post! It’s also the end of October, so I figured I’d commemorate by featuring my kids’ geeky costumes through the years.

2010—Doctor Who, Star Wars

Only a month old, and I subjected the kid to two different costumes.

His hair was pretty Tennant-y, so our #1 was #10…the tenth Doctor
doctor

DSC_0951

The Captain and I wanted to be Han Solo and Princess Leia for Halloween, so I made Champ an Ewok costume, too.

ewok

photo-2

I am no good at sewing, so most of these are no-sew. The pants from 2010–2011 were sewn, crappily by me, in an idiotic fashion. Basically I made no allowance for my poor child’s rear end, so the pants never fit over his bum. In 2012 (see below), I found a pair of pants from a thrift store. They were a size too small and had flowers embroidered on the back pockets, but they worked.

2011—Aladdin

In 2011, my neighbor and I thought it would be cute to take Champ and E out trick-or-treating together and do matching costumes. I can’t remember how we cam up with the idea, but we decided on Aladdin and Jasmine. E already had the cute headband, so I rifled through Target clearance for mint-colored clothes for her and fashioned a bikini top, and then cut out a vest and sewed two quick fezzes for Aladdin and Abu. It was chilly, so we put them in white layers to keep warm and modest (I had no luck finding skin-toned shirts!).

aladdin

2012—Hobbit

I got this shirt for Champ from Woot Shirt when it was the shirt of the day. (You can get your own here!) The wig and pants came from a thrift store, the cloak was just a piece of fleece I tied around him, and the feet were tan socks pulled over his boots with fake fur hot glued to the top.

hobbit

bilbo-HW

2013—Sherlock and John (from BBC’s Sherlock)

Now that I’ve got two little ones, and it’s probably the last year I can choose Champ’s costume myself, I figured it was the perfect opportunity to dress them up from my favorite show, BBC’s Sherlock.

If you are familiar with the fandom (which is completely insane due to prolonged hiatuses of the show), you might be aware of the animal comparisons between the main actors, Benedict Cumberbatch and Martin Freeman, to animals—an otter and a hedgehog, respectively. See Benedict otters here and Martin hedgehogs here.

So I decided to make my baby John a hedgehog and my Pre-K Sherlock part otter. Here were the results:

costumes2013

John: baby snowsuit + fake fur + sweater vest.

Sherlock: Hat from Amazon, colored grey; wig from thrift store; Old Navy jacket; scarf we owned; sewn pants and tail.

hedgehog-b

John after the Reichenbach fall.

sherlock2 copy

This kid is seriously a champ.

I’m hoping next year I can convince Champ that he really wants to be C-3PO so I can make Lion R2-D2. But he’s a cool kid, so whatever he picks is probably going to be awesome.

2014 update

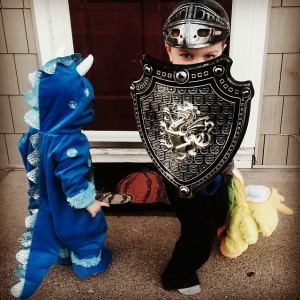
Champ was four, old enough to pick his own costume, and he wanted to be Mike the Knight. So we went as a medieval family. I purchased all the costumes, since Captain had returned from a four-month long training just a few weeks before.

halloween 2014  2014 kids

2015 update

Champ was five, Lion was two, and they both wanted to be their favorite super heroes: Iron Man and Captain America, respectively. For the Denver Comic Con, Capt was also Captain America, and I was Agent Peggy Carter. For Halloween, we got Champ the Iron Man suit costume.

bewildered-mother-costumes-2015
capt-bewildered-mother-2015

bewildered-mother-civil-war

Holiday Crafts

Last month we made Turkeys with our hands and feet.

turkeys

This month was Christmas ornaments. I’ll start with the photos on the tree, then explain how we made each ornament.

craft5

craft4

craft6

Handprint Reindeer

craft3

We used the recipe from Martha Stewart to make the cinnamon dough. I traced Little Champ’s hand onto a piece of paper and used that as a mold, then poked two holes with a chopstick (one to hang, one on the thumb for the antlers) and baked according to the recipe, turning once.

The next day I put on the finishing touches. I got micro bells and micro pompoms from Michaels. I strung the three bells onto a wire, bent around the “neck” and twisted it in the back. Then I glued the bells down, the nose, and the googly eye. I think I used three pipe cleaners for two reindeer—one cut in half made the two smaller sets. I pushed both one long and one short through the hole, folded them in half, upwards, and curled the ends.

Handprint Ornaments

craft1

These actually didn’t work out too well. First I squirted paint on the inside of the bulbs and turned them around to get the insides fully coated with paint. That took a while, and then they took a long time to dry (I kept turning them around every few hours). Once I thought they were completely dry, I hung the plastic kinds on the tree, and now the paint has pooled to the bottom, even though I had them drying for a week. We still have them up on the tree—I’m pretending the abstract look was intentional. Same results with plastic and glass ornaments, house paint and acrylic paints. (It also took a few tries to get good-looking hands on the bulbs.)

Button Trees

craft2

I’m hoping these are pretty self-explanatory, but I’ll post images below. I got a jar full of green buttons from Walmart for a few dollars. I tried a few different combinations, but I ended up liking the trees that were similar in color best. The transparent tree is my favorite because it looks great against the Christmas lights, but it doesn’t photograph well for that same reason.

I found out that they looked best when I made a single half knot between buttons (not a square not, which is two half knots), and on the four-hole buttons, I thread through the diagonal. I finish with a square not on top of the tree, and then knot the strings at the top to create a loop to hang the tree.

button1 button2 button3 button4 button5 button6

TUTORIAL: Greeting Card Box

Have you ever been in one of these situations?

What am I going to do with this decades-old greeting card that I just can’t seem to throw out?

How can I recycle/reuse my Christmas Cards?

I should have left for the party an hour ago, but I can’t find a stupid box for this small gift! I’m about to throw it into a security envelope and be done with it!

Never fear, the Bewildered Mother is here to rescue you. These boxes are perfect for giving jewelry or stocking stuffers or notes or other little gifts. Chocolate is always a good idea.

A few things:

  1. These can be made in any size, out of pretty much any kind of paper. Yes, even that ridiculously thin copy paper. I haven’t tried it with tracing paper…now I’m going to have to.
  2. The boxes will always be square shaped.
  3. When closed, they don’t make a cube; they make half of one.
  4. Use the same size paper for the top and bottom. You can use the back and front of a folding greeting card, if you’d like.
  5. Have fun making nesting boxes for really small gifts (like, maybe an engagement ring, perhaps?) The smallest I’ve tried was less than half an inch wide.
  6. Best part? You don’t need wrapping paper or tape. If you are an expert at ripping/tearing, you don’t even need scissors. Booyah!
Oh, and if the tutorial images below don’t all load, just refresh the page.

Have fun!

into the swing (of things)

The last few weeks have been filled with chasing the little man around (he’s very fast at scooting), buying stuff from thrift stores, and trying to get into a schedule of housework, which right now includes a whole lot of catch-up work from the last year of being pregnant, having a newborn, and catching up on all the stuff besides housework that I’ve needed to do.

little champ

CAUGHT RED HANDED: Little J likes to pass the time by getting into things and chewing on shoes. He will go after them while you are wearing them, too, which sometimes makes social gatherings even more awkward.

Other hobbies include showing ice cubes who’s boss.

Pulling things off of shelves and waving them about madly.

Eating “cookies” and looking grown up. (Looks like I will need to cut his hair again)

And literally getting into the swing.

this momma

Now that Joey is finally starting to nap regularly—it’s still a battle sometimes. Obviously he would rather spend every moment with his awesome mommy—I am able to catch up on things and tie up loose strings. (rhyme not intended)

I’ve tried to take hold of my chores because I have been slacking and not getting into a schedule. I’d been writing daily to-dos and notes to myself, but needed a checklist/schedule I could keep constant. Once I decorate the magnets, I will post a tutorial on how to make your own :)

I finally finished the tiny throw pillows (each is about the size of a man’s fist) for my neighbor’s daughter, who was born in December… Hey. They took a long time because I hand-embroidered her name on the backs of the pillows, I’m new to embroidery, and I rarely get more than 3 consecutive minutes to do crafts.

Because I tend to not have 3 consecutive minutes to do anything except sleep and (sometimes) cook, I’ve gotten really far behind on folding laundry. Also because I hate folding laundry. This is about 5 loads of laundry and took me hours to fold, because I have an adorable sweet baby to chase around and entertain and feed and change. (I wouldn’t trade lives with anybody!)

I’ve also been going to church 8-10 hours a week and hosting two Bible studies. Lots of God, lots of treats, like these fruit tarts I made in a graham cracker crust. Check out the recipe here.

This one’s crust wasn’t particularly pleased with my brushing it with almond bark. I don’t recommend this for crumb-y crusts.

Wedding: Part Three

Part Two

Part Three: The Reception

I really wanted to have a dance. I found an elementary school / community center where we could do it about 15 miles from the chapel. We ate and danced in the dining hall. The lights and colored hardwood floors were really fun, and there was plenty of room for people to sit and eat, stand and mingle, or dance. My favorite part? The children’s art that lined the hallways.

We couldn’t do a slideshow, so I made photo trees. I scanned a bunch of photos of LT and I growing up. Then I printed them at Walmart, cut them up, and my personal assistants punched holes and added the ribbon. They really should have been paid for all the work they did. I am so grateful to them!

Here’s the centerpiece for the head table. I bought decorations that I would be able to use in our new home together. The vase was $20 clearance at JC Penney’s. Filling the vase are the fresh anemones that I had originally planned to use for our bouquets. I am actually really happy I ended up using fake flowers (see my bouquet at left). All the candles are in our home now.

After a yummy lasagna meal, I got to cut the cake with LT’s saber, a Marine Corps tradition. Our cake was carrot with a cream cheese frosting. Everybody else got a marble sheet cake made, cut up, and served by the caterers. The carrot cake was AMAZING. I am pretty upset nobody saved another piece for LT and I!

Unfortunately I don’t have any photos of the centerpieces for the guest tables. On each table was a white tablecloth. In the center was a black “puddle” of fabric, on top of which we’d scattered black river stones and white glass stones. In the middle of the black fabric was a clear plastic square plate (check the party section) with tea lights and mason jars. The fabric and mason jars were reused from my matron of honor’s August wedding. Favors were three jingle bells from Michael’s tied with ribbon with a tag that had LT’s and my name on it, with our wedding date (yes, I altered the photo for privacy’s sake). Guests could jingle the bells to make us kiss, and could take them home as Christmas ornaments.

I hated the thought of buying a pretty guestbook only to have the first two pages filled with names like an impersonal roll call. Instead, I bought a scrapbook and put a page at every table along with a box of crayons. People could be more creative and have fun while waiting for their food. We got a sweet note or a doodle from everybody. After the usual (husband, dress, ring, bouquet), this is my favorite keepsake of the wedding.

After dinner, dancing, and dessert, I tossed the bouquet and LT and I made our escape to the Saint Paul Hotel, where we stayed a few days before we packed up all my belongings and made the move to NC. I think you know what happened next.

Photos by Beautiful Era, friends and family.
Location: Oakwoods Room at Eisenhower Community Center/a>

Baby Food

I would love to make baby food for the little man. Unfortunately, with all the pizza and ice cream in our tiny little freezer (and frozen fruit…) we have no room for baby food, yet.

So in the meantime, I’m feeding my little man organic jarred baby food that was marked way down and on sale at Babies R Us. It also makes me happy, because then I get to reuse the baby jars later.

Also, I am relying on those awesome mesh feeders I talked about as a really easy way to give Baby J frozen fruit and veggies all the while soothing his teething gums and teaching him to self-feed. I got one from Babies R Us but they are available in two-packs from Amazon here.

The plan was to just start him on veggies before introducing the glory that is fruit, but now I am allowing him some as a treat or “dessert” after he eats the vegetables. As much of a meat-loving family we are, I think that a vegetarian diet is the healthiest out there, and I am not going to give him meat until he is no longer breastfed and is a toddler. Hopefully by then LT and I will be eating mostly fish and lean meats (I am already trying to limit red meats—though I love them so—to sit-down restaurants and pasta dishes).

If you are interested in making baby food for your young-un, here’s a blog post from Simply Thrifty that can help  you out.

Future Frugal Friday: ReFurbishing Furniture

This past Friday was a mom-must-stay-offline-at-all-costs-so-she-cleans Friday.

But Saturday I did some frugaling and got an Amish rocking chair for $30.

As soon as I saw it from afar, I knew it would need new fabric. Should be easy enough, right? I have seen furniture that was reupholstered using towels. Here’s what it looks like now:

There are also some tears  in the fabric, so I will need to reupholster it anyway.

The sad thing is, after I had bought it and driven away, I realized that it came from a smoker’s home. Flashbacks ensued to the nightmare that was the first bed frame LT and I bought. After 2 hours of cleaning and scraping tar off of the wood, we gave up and returned it, whether they would give us our money back or not.

But I have been wanting a rocking chair like this for about forever, and for $30, even the slightest possibility I can get rid of the smoke smell is enough to get me motivated.

I am thankful, though, because before I went to the hardware store to find some heavy duty sand paper, I googled refinishing old furniture (I don’t want to mess it up) and I came across a video tutorial by Eric Stromer! If you don’t know who Eric Stromer is (at least by face and hair), you don’t watch HGTV. All the ladies LOVE Eric. And you want to know why? It isn’t his flowing, golden locks (a la Prince Charming from the Shrek movies), or the fact that he is a manly carpenter man in a world full of  women and flamboyant interior decorators. It is because in one of his shows, he would dip his fingers into the paint and smear the color onto the wall with his hands. Men: feel free to try that move the next time you and your lady are painting a room. I can’t guarantee results.

Anyway, I am having trouble embedding the video, so click here to see it..

Usually I am against using chemicals when I can help it, but the extra “kick” might dig deeper and get the nicotine smell out, too. I’ll see. I’m going to have to get a sitter, though, so my little man isn’t anywhere near the garage when I am using the stuff.

I am really excited and a little terrified to rework this chair. If all goes well, I think it will be a great addition to our work-in-progress bedroom!

Who knows when I will get the chance to work on this baby, but I will post updates on the progress I make :)

P.S. Can’t wait for my tutorial on reupholstering? Check this video out.

Mommy DIY: Nursing Pads

Every new mommy, breastfeeding or not, will find herself endowed with a set of what might as well be water balloons hiding under her blouse. The solution, or rather, prevention, of motherhood-induced wet T-shirt contests is to use nursing pads. And because we are a nation built upon disposability, we either have the choice of buying enough boxes of disposable nursing pads over a few months to dam up the Colorado River, or we can spend $20 to buy two or three pairs of washable nursing pads.

After two brands of nursing pads and three boxes, I was looking for an alternative. I’d rather not spend $6-12 per month on something I can only use for an hour and a half.

I tried the ultra-thin Nuk brand because, let’s face it, it was the cheapest. Nuk and Gerber are reliable brands, right? Maybe for babies, but certainly not in the mammary department. I could render a pair doused and useless in less than 30 minutes.

So then I went a more expensive route. Medela is the brand I use for my breast pump, so I tried them out. They worked—I even went a full day forgetting to change them—but they freaked me out. First of all, I am pretty sure they use either 1) the same chemical pellets used in disposable diapers or 2) alien nuclear technology. No joke, the pads somehow turn breast milk into a pasty gel, that squooshes when you poke it. If I had eaten something spicy, I am pretty sure that milk gel would have sprouted tentacles, stolen my car, and driven to Cape Canaveral. Also, I still didn’t want to spent ten to twenty bucks each month for the next year.

So I did some sleuthing and research on absorbent fabrics. All I needed was five dollars to make enough nursing pads to last the rest of my baby-producing life.

Ready to nip leakage in the breast? I’ll show you how it’s done.

I am a novice machine-sewer, so I have extra steps that helped me out. More advanced sewers, just be patient. (I just realized that sew-er is spelled the same as sewer, as in sewage. That is really depressing. I meant seamstress. Apologies to those-who-sew, on behalf of the English language.*)

*Yes. I can speak on behalf of the English language.

Step 1: Buy and prewash fabric

You will need microfleece (or polar fleece) and flannel. Shop the remnants section to get better deals. Get 3x the flannel as the fleece (Is it just me, or do way too many fabric names start with F? Fabric, fleece, flannel, felt, microFiber…). How much will you need? Check out Step 2 to get an idea.

Don’t forget to wash and dry the fabric before starting!

Step 2: Cut the circles

Figure out how many pairs of nursing pads you want to make. I usually use one pair during the day and one at night. I rarely use more than 3 pairs in 24 hours. Six is enough if you do the laundry every other day. I would recommend 8-12 pairs, so you have plenty of extras.

Multiply that by two (since one pair=2 pads). That’s how many fleece circles you need. Then multiply the number of fleece circles by three to find out how many flannel circles you need.

(8 pairs=16 pads=16 fleece circles=48 flannel circles)

Each circle should have a diameter of 4-6 inches. I made mine 5.5, so after trimming (last step), mine are a little over 5 inches in diameter.

If you want thinner pads, then 2/3 of your flannel circles should be about an inch smaller in diameter.

Step 3: Assembling the circles

Start with the fleece circle. Add 3 flannel circles to the top, “pretty side” facing you. For thinner pads, add two small flannel circles topped off with one big one.

Step 4: Sewing the circles

Choose a medium-sized zigzag stitch (that’s just my preference. You can choose others, or hand sew).

With the flannel side up, place the circle under the foot in the 9 o’clock position. (Fleece-up seems easier to work with, but then the pad will curve the wrong way, inside-out, creating awkward bulges…)

Use your right hand to pull the circle, rotating it clockwise as you sew.

The circles may very well warp or pleat. Don’t worry, this helps the pads conform to your basoomas.

To reinforce the stitch, double up at the end by sewing a bit past where you started.

Step 5: Trim

Trim about 1/4″ around the stitch. Know that washing and drying the pads will cause some fraying around the edges.

Step 6: Woot!

Yay! You are finished. Make more! Give as gifts! Save money!

[Wearing]

To wear, place the flannel side towards your skin (flannel wicks away moisture) and the fleece side towards your bra / shirt (fleece works as a barrier). Trade in for a new pair when you feel any dampness, to avoid leaking.

[Washing]

To wash, put the pads in a mesh lingerie bag. Wash and dry without softeners. (Softeners build up on fabric. You shouldn’t use fabric softener anyway, but definitely do not use it on any fabric meant to absorb moisture!)